Tuesday, July 8, 2014

Mother's and Father's Day

Hey all. It's been a crazy couple of months so I apologize for the super belated post. Lots of things going on in the classroom and at home. I will be sitting at home on my couch and think, "Hey, I haven't posted any of my awesome new activities on my blog. I should probably do that now." Then I look at my computer (which is a whole 10 feet away from me) and think, "Maybe later. The computer is so far away and it would take more energy than my body has right now to move over there and way more brain power than I have available to actually form a coherent sentence that people may begin to understand." Hence why we have reached almost two months later before a new post has been made.

As I said, it's been a crazy couple of months. The kiddos are learning like nobody's business. The hubby graduated with his master's degree. Our Mother's Day project (best idea I have ever had) took some serious at home work. Memorial Day weekend happened with some serious no-technology camping. Vacationed in Nashville and hiked a mountain (No joke about the hike. 2700 feet elevation gain in 3.1 miles. I shudder to think about it.). Came back to work to jump in with both feet on our Father's Day project (not nearly as much at home work as Mother's Day. Sorry, Dads). And here we are. Almost three weeks after I wrote this draft. With lots of updates. Where to start, where to start.....

I'm really excited about our Mother's Day project so I will start there. I found an awesome idea on Pinterest to make coasters out of the kids' art work. Kind of a process but fairly cheap and totally worth it. I just hope all the moms appreciated it as much as I loved it!
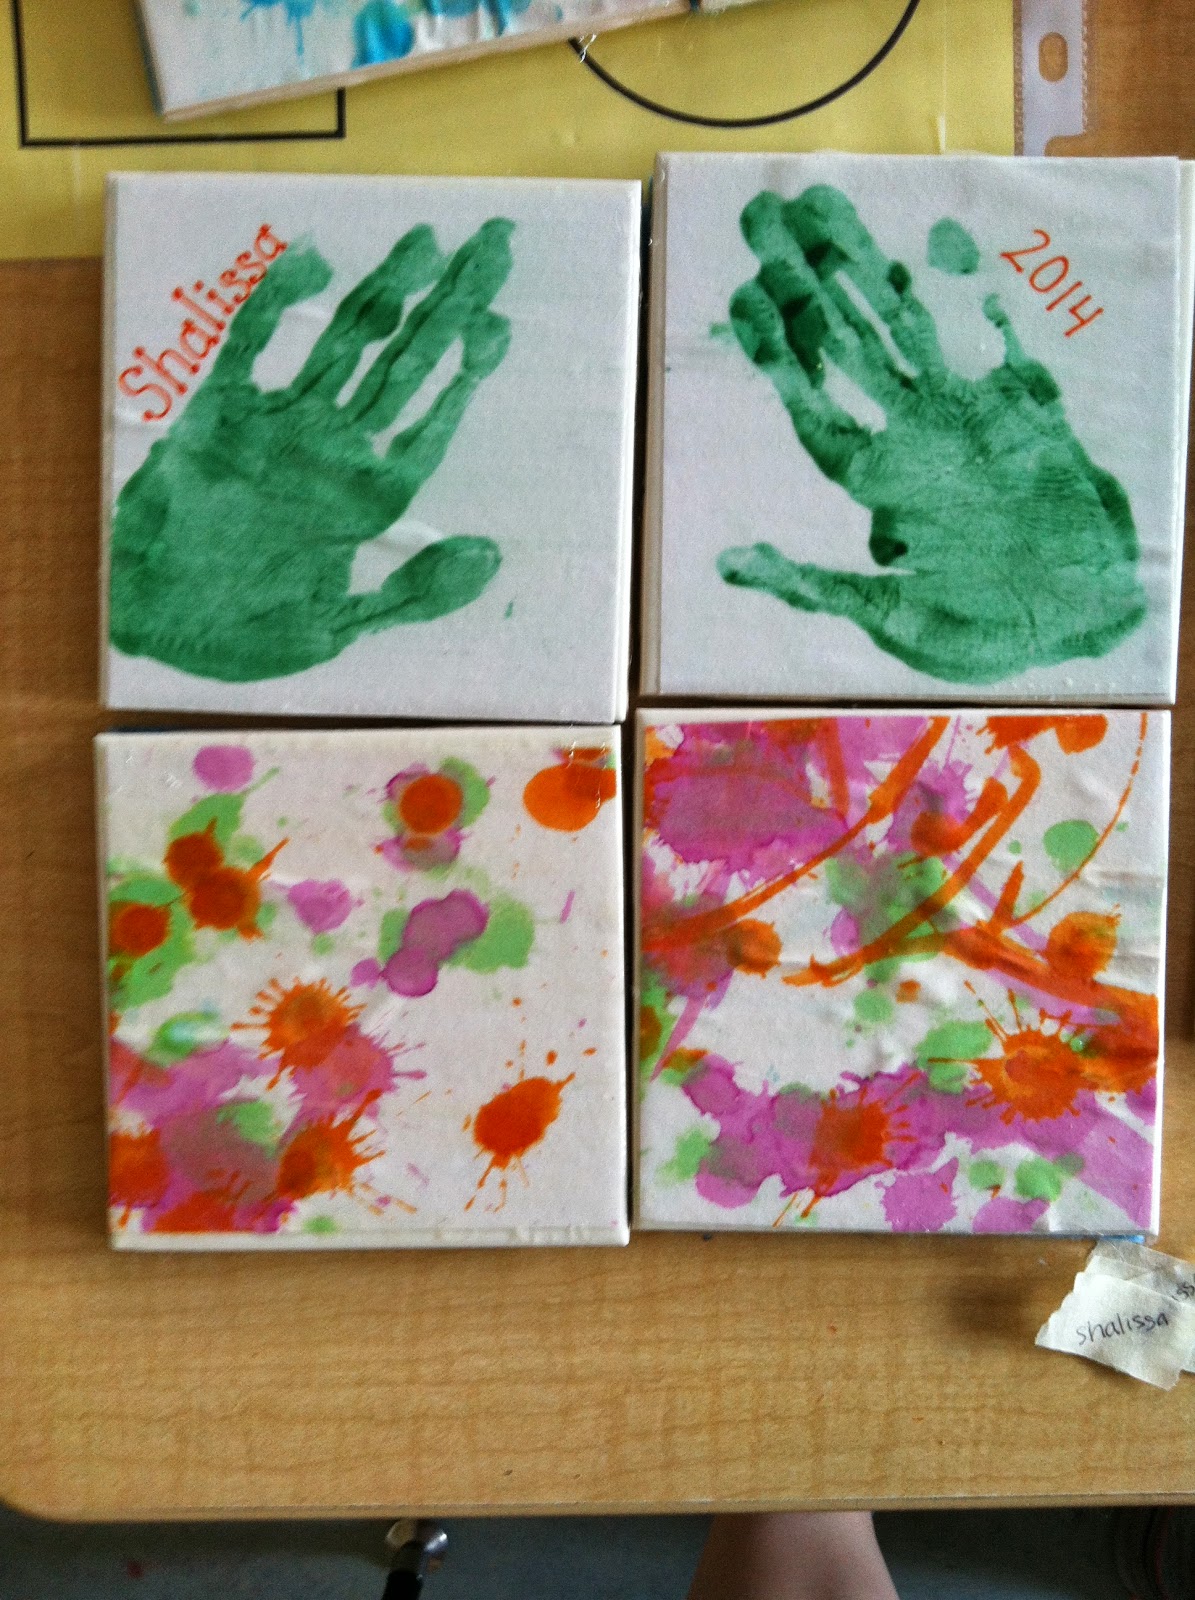
 -  I started with the kids' artwork. I just discovered some really awesome metallic dot markers (also known as Bingo markers) hiding in a closet here. I gave them each a marker and white construction paper and they went to town dotting away. To get a variety of color on their papers I had them trade colors every minute or so.

- Next came some shopping. The materials needed:

  • Mod podge
  • 4"x 4" white tiles - cost is about $0.16/tile. I found mine on sale for $0.2/tile at Lowe's. Sweet!
  • Acrylic clear coat - Small can. I made 52 coasters and with 3 layers on each coaster. Used maybe 1/16 of the can I bought. 
  • Felt - backing for each coaster
  • Hot glue 
- Each child made a set of four coasters. I cut out two squares from their dot artwork. I made the squares slightly smaller than the face of the tile so the paper didn't extend over the sides. I cut another two squares out of plain white construction paper and had them squeeze their handprints onto those squares. 

- I stuck the artwork to the tiles using mod podge. A layer before you put the artwork down and then a layer over top. Do your best to squeeze out the bubbles. The dot markers/paint made the construction paper shrink up a bit so it wouldn't lie completely flat. Hence I had some ridges/bubbles in the coasters. They still work fine, they just don't look straight from a store. Gives it more of a home made quality.

- Coated the top and sides of the tile with 3 layers of acrylic clear coat. I probably would have been okay with 2 layers but I wanted to be on the safe side and the clear coat dries pretty quickly.

- Finished with hot gluing a felt square on the back of each tile to prevent scratching. I covered the entire back of the tile but you could probably just do small squares in each corner. I think the entire back looked nicer.


Even if you don't need coasters in your house, this is a great project to keep a nice piece of your child's artwork without the worry of it being ripped up or lost. 

Mother's Day weekend was also graduation weekend for the hubby so we had a lot of family in town. I had some extra tiles leftover (at $0.2 a piece I wish I had gotten more!). My nieces stayed with me so I had them each create a coaster to give to their mom (my sister). The two oldest are 7 and 9 so they were able to draw actual pictures with my fine point sharpies and they each wrote a message on theirs. I was able to get the 18 month old to sit down for a quick second and make a scribble with a crayon. Sis also has a fourth baby on the way so once we gave her the other three coasters I got one of her ultrasounds and made a fourth coaster. That turned out super neat.

Needless to say, I absolutely loved this project. The most expensive part was the clear coat but I have a ton leftover to use for other projects at home. 

Father's Day I had to get a little more creative for. Apparently people don't like to be as crafty for Father's Day and there weren't nearly as many ideas on Pinterest and other websites. The only thing I could find were cute sayings for cards. Lame. I mean, that's great and all but after an awesome Mother's Day gift I can't bail on the dads! So my mom helped me come up with some decent ideas and we went to Hobby Lobby to price them out. Best place to go when you don't know what to do. You may be there for a while but I came up with more ideas once I got there. Finally settled on making keychains with wooden beads. 

- Materials for this project:
  • Wooden beads - mine were assorted colors but I also saw some really nice wood colored beads. Cost was $3.99/pack, each pack had 150 beads.
  • Key rings - Pack of 80 assorted metal rings/key rings. Cost $2.99
  • Nylon string


- I distributed the amount of beads I had evenly between the kids which gave them all approximately 20 beads. This made for a rather long key chain so I decided to loop it around instead of having it hang down. Less beads probably would have looked nicer but my kids love to thread beads so I let them enjoy themselves. I didn't want to use only parts of what they put together so we made it work.

- I figured out the kiddos do best stringing beads with pipe cleaners. I then took the pipe cleaners home and transferred them to the string I bought. That was probably the toughest part because the string was thick and some of the beads were really small. I though about using leather but wasn't sure how the tie would hold. 

- Once the beads were strung, hubby tied it around a key ring (don't ask me how) then burned the knot to melt it together and hopefully keep the beads from falling off. Other string would also work for this project but I liked being able to melt the nylon to hold the knot. 


I have a lot more projects to report on but had to get these out there since I was so proud of them. We have been working on colors and shapes the past few months so I have been really making the kids focus these past weeks. I finally came to the realization that they are newly 3 and don't need to know everything right now so I have decided to give the munchkins a break for the summer. Our current unit is zoo animals and I'm mixing in some science play to keep their minds active. Hopefully a new update will be coming your way shortly!

Sunday, April 13, 2014

Rainbow Spaghetti

Rainbow spaghetti sensory play was an amazing idea. One of the best ideas I have had yet. The kids absolutely loved it and it went perfect with our rainbow study (following along with The Rainbow Fish by Marcus Pfister) However, keeping said spaghetti in the sensory table for two days was an awful idea. Luckily I checked the spaghetti on Friday before leaving for the weekend and avoided returning to some crazy science experiment on Monday. At least the kids enjoyed having the door propped open so I could stick the table outside while I cleaned out that awful disaster.

Back to the good news of the experiment. My rainbow spaghetti process:

  • Boil spaghetti - I used two large boxes and one regular size box of spaghetti. This was definitely enough for 8 kids. I probably could have gotten away with a little less.
  • Let spaghetti cool then separate into containers for coloring
  • Add food coloring and vegetable oil as desired. I used quite a bit of food coloring  (10-20 drops) to make the color as dark as possible. Which is why I had to run to the grocery store at 10:45 pm to get more food coloring. The vegetable oil was to keep the spaghetti slimy. You honestly don't need to use too much of this. Just enough to keep it from sticking together. I also had a friend suggest using coconut oil next time. The vegetable oil flared up some dry skin problems on my hands. I must not have mixed my red and blue very well because my purple looks awful in the picture below. However, in the table it looked really good.
 The kids absolutely loved digging into the spaghetti. Surprisingly they weren't at all hesitant. I poured each color in separately and they had them all mixed within about 30 seconds. I threw in plates, bowls, and spatulas/spoons we had in our kitchen play area. I also had 3 tongs at home I bought for the husband's graduate percussion recital for about $2 at one of those party stores. They loved using the tongs so I would highly recommend investing in those.


With how cheap this project was I would definitely consider doing it again. Tips for next time though:
  • Use the biggest pot possible to boil all the spaghetti in so I don't have to do two rounds. Only reason I had to do this was because I decided I wanted more spaghetti after boiling the first batch.
  • Make sure to have enough food coloring to avoid late night trips to the store.
  • Try coconut oil and hopefully my hands won't be in pain for the next three days.
  • Clean spaghetti out of sensory table the same day as put in the table. If I had cleaned out the spaghetti and refrigerated it, there is a chance I could have gotten another go out of it.
Sensory table activities are probably some of my favorite even though they are the messiest. Most activities in the table will keep the kids attention for at least half an hour. Any ideas of what to try next in the table are definitely appreciated!

Tuesday, April 8, 2014

Green

My interaction with the aforementioned child and the color green. My interaction with him in class today approximately three weeks after the conversation from the previous post.
Me: (As I'm painting his hand red) What color is this?
Child: Green
Me: Say red
Child: Red
Me: (As I'm painting his other hand yellow) What color is this?
Child: Green
Me: Say yellow
Child: Yellow
 Well, I got what I asked for. He said the color green. And he at least said multiple color names! Yay! I putting that in the win column.

In other news, I went on a cleaning frenzy this afternoon. A half hour before the end of my shift. As the eleven kids are all over the place. With toys strewn every where. Good choice, me. Apparently though I need to cut back on the art projects. I can't even count how many stacks of artwork I had lying around the room to be sent home. And please don't ask how many art-projects-in-the-works-Ms.-Kali-needs-to-put-the-finishing-touches-on-them-but-doesn't-have-the-time-or-energy-to-do-so I found. I bet you can guess where they all went. Yup, straight into the trash. Teacher of the year, right here! Oh boy....

On a final note, I may have accidentally taught a two and a half year old the term "doody head." Whoops.

The Very Hungry Caterpillar

So this was meant to be posted last night (Monday). But I ran out of energy and was then drowning in fish. No, really. I was tracing, cutting out, and laminating fish. Anyways....

Last Friday wrapped up our month long unit on The Very Hungry Caterpillar by Eric Carle. This started out as just wanting to read the book in class because I found a movie version on Netflix that I wanted to show in class. Once I read the book though I came up with some ideas of activities and crafts to go along with the book. And each week when it came around to writing my lesson plan I found more and more ideas that I wanted to try. So a month later I think we are finally ready to move on to something else. Although, I continued to get requests for the caterpillar today. Nothing makes a teacher feel better than when the kids actually want to do an educational activity.

Our focus in the past few months has been colors. It started out as just matching pretty much anything I could think of (for example: here is a pig, where is another pig?). Honestly, I don't even know how we got sucked into matching color. Probably all the great color matching activities on pinterest. So we started focusing on colors. We seem to be pretty accomplished at matching colors. Color naming is a different story. I'm pretty sure when I ask what color something is, each child picks their favorite color word to say and goes with it. Then there is the child that just says, "mine." This is the interaction I continuously have with him.
Me: (After already holding up the same color marker 8 other times and all of us saying green) What color is this?
Child: Mine?
Me: It's green!
Child: Mine?
Me: Say green.
Child: Mine
Me: Say green
Child: Mine
Me: Grrrreeeennnn
Child: Mine
Me: Grrrr....eeeeennnn
Child: Mine
Me: Say green first.
Child: Mine
Me: Green
Child: Mine
Me: Say green
Child: Mine
Me: Here's your marker......
Needless to say, we have been extremely focused on naming colors. Glory be to God, we are making some progress! Well, most of us are....

The Very Hungry Caterpillar was not only a great opportunity to talk about colors but also healthy foods. Our center recently received a grant to teach Healthy Habits so we are supposed to be talking about sometimes and anytime foods and encouraging healthy activities. The Very Hungry Caterpillar ate a diversity of food which was great to start a discussion on sometimes and anytime foods. I found some amazing activities to correlate these two focuses and of course started another pinterest board dedicated solely to The Very Hungry Caterpillar.

We kicked off the unit by of course reading The Very Hungry Caterpillar. As I read the book I made sure to make it as interactive as possible. Anybody who has read a book to a toddler understands how quickly their attention strays. As long as I keep them focused and looking for something I can get them to sit and listen. Maybe they will even remember something. The most important interactive part of the book was the first five days the caterpillar ate. I had them tell me what color and what food the caterpillar ate each day. By the third time we read the book they were telling me without me even asking.

We made a giant caterpillar out of paper plates. Each child painted a plate different color then we put the caterpillar on the wall. I found pictures of each of the foods the caterpillar ate and we pasted them onto the paper plate that matched the color of the food. Sorry the photo below does not show the an up close view of the food on the caterpillar.


 I then found pictures of the fruits he ate the first five days for us to marble paint. On activities such as these when they are required to take turns I also get out something to color with. I don't have to worry about them touching my paint, fighting with each other, or losing interest and walking away. We painted the same amount of fruits the caterpillar ate (meaning each child got to do at least two).

To keep up our discussion on healthy foods, I tried to include a food craft or activity each week. The first week we did carrot footprints which were super adorable as you can see. That was followed by painted red apples which never got cut out (way to go me...) followed up with our "Healthy Foods" and "Sometimes Foods" discussion.  Since they don't quite understand the concept of time yet we have been discussing what foods are good for our bellies. A food that tastes good may not be good for our bellies. If we eat too much of the sometimes foods they will make our bellies hurt. I'm not sure how well this is working yet but they seem to understand that fruits and veggies are anytime foods. Maybe eventually it will sink in.

 There have been many more projects correlating to The Very Hungry Caterpillar seeing as I try to an art activity every day and we have been focused on this book for the last month. But more about those activities and crafts in a future post.

If you like any of these ideas, want to see some how-to's or would like to see any other ideas I had/tried check out my pinterest boards at www.pinterest.com/kalielayne.

More to follow soon.....

Saturday, April 5, 2014

Organizing the insanity

As I approach the end of my first year as a toddler teacher I have begun to realize how much I owe to my toddlers. Every day I seem to come up with a new solution for a problem I'm having or spend countless hours conversing with coworkers and scouring the internet for solutions. Pinterest has become my best friend when creating lesson plans (seriously, you should see how many boards I have related to toddler art, activities, resources, bulletin boards, etc). However, what I have come to notice in my endless hours of pinterest each weekend (ask my husband how easily I get sucked in) is that all the great ideas/blogs I find seem to come from stay at home moms. Don't get me wrong, they have some spectacular ideas. But I spend a lot of my time trying to decide if this activity done with 1-2 toddlers is going to work in a classroom of 10-12 toddlers and also if I have the same resources available to me at work. I work for a nonprofit "learning center" so whatever isn't available (of the very little we have there) comes out of my own pocket. Trial and error has become a new protocol in the classroom. Some things I have determined should never ever be done with a group that large or cost way too much money for me to do again (no more buying and coloring 9 pounds of rice). Others are a major hit that I want to do every single day! The only problem is, through all the insanity I have trouble keeping track of what works, what doesn't and what I want to try next. I surround myself with lists that help me organize my brain temporarily. But then the list ends up in a basket beside my bed with the countless toys that find their way into my pocket and enjoy the drive home with me every day. List: gone. Never to be seen again.

Hence, this blog. Inspired by Insanity: Life in the toddler department. A place for me to organize my thoughts, post pictures of results, and make lists of what needs to be done/what should be tried. Maybe I will even throw in a hilarious and/or endearing toddler moment every once in a while.And maybe in the process of  this creative chaos I can help another toddler teacher out there somewhere with their struggles. I may not have a lot of experience behind me working with toddlers but I like to think I have some great ideas to contribute. In the meantime, any suggestions/comments (only helpful, please!) in response to future postings are highly welcome. 

So for today, no ingenious ideas or adorable toddler artwork to share. I have fish to cut out, fishing poles to be made, things to laminate and in-laws to prepare for (fish/fishing pole are not for the in-laws...although, who knows, maybe they could be my next test subjects). All you get today is an introduction. As I tell my toddlers, you'll be okay. Just breath and get over it. More will come soon. Hopefully in the next couple of days here. Lots of great ideas to share as long as the insanity doesn't get me first.

Speaking of insanity, they finally fixed the roof in my classroom! There is a giant crack where the wall meets the ceiling. It looks as though they tried to prepare it at one point with dry wall tape. Whenever the wind blows, which has been quite often lately seeing as it is storm season, the wind gets trapped in between the ceiling and the dry wall tape and vibrates at a ridiculously loud volume. For the past, oh, 3 months of so this has been going on. And it always seems to start at nap time and continue on for the rest of the day. So as my kids are yelling over top of this absurdly loud noise (we have high ceilings making everything echo and sound three times as loud) my boss walks in and says, "you should play some music over top of it to try to cover the noise." Sometimes I wonder if people think about what they are saying before it comes out of their mouth.....Anyways, noise fixed! Maybe the insanity will recede a little bit this week....